Showing posts with label #Summer!. Show all posts

Saturday, 2 June 2018

Baking Post N0.17- Recipe Compilation post PT.2

Hola a todas!!

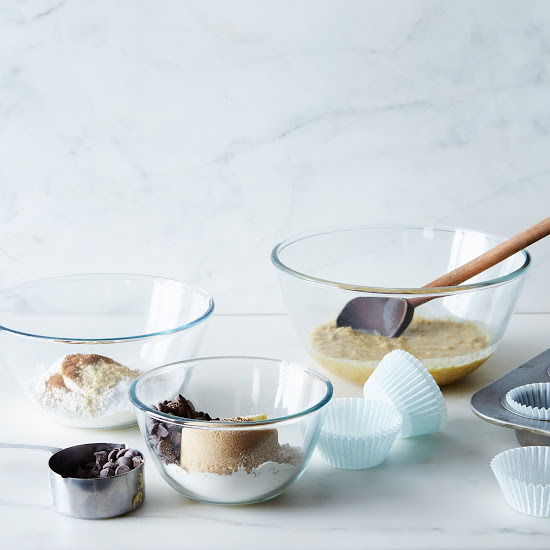
Happy Half Term holiday! I hope you are happy and well and making the most of the....reasonable weather over the holiday! I'm back with good news... after weeks of waiting, I finally have those photos of the Carrot Cake Cookies which I'm taking the opportunity to share with you on a fresh page and new intentions. As you all know, this is the start of a new month and for me that means another chance at starting my life on WHOLE new level(well that's what I've been telling myself at the start of every month for 6 months). Likewise, there are ADJUSTMENTS I'll like to make to my blog layout, and to my scheduling and selection of recipe posts. However, I'll take the opportunity to go more in depth into this in a later blog post. Without further ado, here are the snapshots of those delicious carrot cake cookies!

Snapshots:


Before you go,

Now isn't THIS COOL?!↓↓


Song of the month:

EO-German


Now THIS is the part where I insert randomly aesthetic pictures of beautifulness:


Hopefully I'll see you in the next one!

Au revoir!

#sweetreats xx


Saturday, 12 May 2018

Recipe Post N0.15- Carrot Cake Cookies(#I'mback)

Greetings and salutations! 👀❤✌✋☺✋✋☺😇😇

First and foremost, thanks so much  for visiting my blog page today. If you're new here, welcome! If not, thanks for tuning into another one of my sweetreats.😌😝


I understand Summer has finally arrived here in England. With that being said, I'm happy to present you with a summery delicacy , delicoous and hopefully easy enough for you to attempt at home.

In order to concoct the cake's variation of a cookie, you'll need:

140g of cream cheese

140g of icing sugar

½ tsp of vanilla extract

350g of plain flour(for better health alternatives, I'm substituting plain flour for spelt flour)

½ tsp of baking powder

1 tsp of ground cinnamon

1 tsp of mixed spice(if available to you)

140g of butter, softened

105g of soft light brown sugar

1 egg,beaten

200g of carrots, finely grated

zest and juice of one orange

3 tbsp of finely chopped walnuts.

Method:

Firstly, incorporate the cream cheese, 3 tbsps of icing sugar ad the vanilla extract into a bowl, then place into the freezer to firm up for around 30 minutes.

In the meanwhile, combine the flour, baking powder and spices into a  bowl. Into a larger bowl, beat the butter and sugar until creamy. Eventually beat in the egg, followed by the carrot.

Tip the dry ingredients into the wet mix and mix to form a dough of some form.

Line a baking sheet with baking parchment and dust your hands with a little flour before handling the dough.

Divide the dough into 14 balls and place onto the sheet. Using the palm of your hand, flatten each ball with a circle. Add 1 tsp of cream cheese into the centre of each one, then carefully wrap the dough up and around, filling to seal it in, pinching the top and rolling back into a rough ball to stop any filling leaking out.

*note: this step can get a little fiddly.

Once all are shaped, place the dough balls into the fridge to chill for at least 30 minutes. Next, heat the oven to 200℃/ 180℃ Fan/ Gas Mark 6.

Bake the cookies for 20 minutes until golden and crisp. Remove from the oven and allow to cookies to firm up on the tray for around 10 to an quarter of an hour before transferring to wire racks to cool.

Mix the siccing sugar with orange juice to a drizzling consistency and drizzle this all over the cookies, garnishing with walnuts and orange zest. 

*note: best eaten on the day however can be stored in an airtight container in the fridge for up to 2 days.

And volia!


Snapshots: I intend on baking this treat at least by Wednesday; I'll make a note in my goals journal.


Before you go:

I apologize for not being on top of my blog posts, I have been moderately occupied in other activities such as...


DOE(btw, not actual picture)


Piano classes...I would insert a clip but Blogger takes centuries to upload short video clips.


And lastly....being ill sucks...!!


See you in the next one! Don't forget to vote in my poll and comment down below on what you liked and what you'll like to see more of.

#sweetreats xxx


Saturday, 26 August 2017

Recipe Post 2017 NO.16- Almond Cake With Chocolate Icing

Hey guys!

As per usual, I deeply acknowledge all your feedback on last week's post-I'll get back to those who are still pending on a reply from me.

This week's recipe... I'd say is a conversion(kind of), from my fruity bakes.Baking with fruits has become a accustomed theme on this blog which, as we are nearing the end of August, I believe it's about time to BREAK the chain⛓ and bring back those good'ol chocolate cake recipes😉. First noticing this recipe, I was drawn to appearance of the actual cake, which was ravishing and IRRESISTIBLE for me to make an attempt. My dearest apologises if my effort isn't similar to the original.😜

(not sponsored) This cake is brought to you by the website,Yummly- a unique,genius method of checking out thousands of recipes, simply with a few clicks of a mouse.

To concoct this GORGEOUS chocolate almond cake,you'll need:

280g of cake flour( as we're unable to get hold of cake flour in the UK,simply as an alternative, replace two tablespoons of flour for corn starch for every 140g)

4g of fine sea salt

A teaspoon of baking powder

4g of baking soda

140g of caster sugar

100g of coconut oil


½ teaspoon of vanilla extracr

1½ teaspoons of almond extract

Almond buttermilk(240ml of almond milk and a tablespoon of apple cider vinegar).


For the filling and icing,you'll need:

2 cans of full fat coconut milk,refrigerated overnight

35g of cocoa powder

168g of good quality,dark chocolate,melted

2 tablespoons of maple syrup.

To top cake:

Flaked almonds

Flaked coconut.

Method:

As per usual, pre-heat your ovens to 176 C, 156 C fan,Gas Mark 3.

Line the bottom with three,round 6" cake pans with baking parchment, setting it aside. Into a small mixing bowl, sift together the flour,salt,baking powder and baking soda and put aside for later.

Into a sizable bowl, combine the melted oil,sugar and both extracts. Alternate between adding your buttermilk and flour mixture to the sugar mix; do this by adding a third of the buttermilk, followed by half the flour, repeating the process 
until the buttermilk is finished.

Whisk batter until JUST combined(if whisked TOO much,you'll overwork the gluten).

Divide the batter between the prepared tins,baking for approximately 28-30 minutes, or until a skewer comes out clean. Allow the cake to cool in their pans for a further 15 minutes, converting the cakes onto the wire rack.

In the meantime, you'll want to make the yummy icing to go in between the layers and over the cake. To do this,begin by opening the cans which are stored in the fridge, hopefully with a white,creamy layer off the top(if I'm lucky enough, I'll take a picture). Unfortunately, if your cans hadn't formed that thick layer, you are unable to make the coconut cream icing. Therefore, it is ESSENTIAL the cans lay in the fridge overnight.

Discard the water, or save for later use. Beat the coconut milk fat on a high speed,using a hand mixer until smooth. Eventually,sift in the cocoa powder and mix until combined. Pour in the melted chocolate(presumably cooled although the recipe hadn't mentioned whether to leave the chocolate to cool or not) and the two tablespoons of maple syrup,beating until smooth.

Once all the cake tiers are cooled,line a plate with a couple pieces of baking paper. Place one out of the three in the middle of the cake ,spreading 1/3 of the frosting onto the top of the cake and repeating the process.

To finish,top the cake with sliced almonds and flaked coconut.Finally,refrigerate cake for 45 minutes to firm up the icing and voila!

Photographs ARE coming shortly:


Before you go...

Song of the month:

Chris Brown-Questions


Check out my last post here: (OVERDUE) Baking Post 2017 NO.15- The Mystery Blogger Award


Snapchat:↘


YouTuber of the month(I haven't done this in a while):


AlishaMarie


Quote of the month(friends loved this one on my personal social media)


Photos of my time in Henley: Pending to upload pictures


Sources for today's recipe:
Yummly


Charity of the month:
 Grenfell Tower- Supporting Tees


Instagram account I've been loving:
CestMaria


Thanks so much for reading this post and I'll see you soon!

#sweetreats xx


Saturday, 20 May 2017

Baking Post 2017- No.9 #sweetreats' Baking Tools

γεια σε όλους!

That is my way of welcoming you all today in Greek! I fancied a change in my introduction.

Referring to the title of today's post, I shall be talking you through my baking tools in the kitchen- the equipment behind those delicious, delectable treats.

Without anything else to say, let's leap right into this week's post!

Currently, my main,go-to baking equipment is an electric hand mixer, wooden spoon(if there happens to be a malfunction with the mixer) and my silicone whisk which I picked up cheaply in Home Bargains. All my equipment included in this week's post shall be listed and priced at the end.
A pic with this whisk
  

If you plan to begin baking or take it up as a hobby, it is advised that you have at least these three items and obviously a range of different sized mixing bowls. There are three sizes of mixing bowls just like there are three sizes for piping bags and nozzles etc,etc.


Moving back onto equipment, as well as obtaining equipment, I believe it's important to update your tools in order to be up to date with what's being used by those top-award-winning baking chefs and popular kitchen TV shows. 

One website which I use for exploration of cooking apparatus is LakeLand which is 35 minutes from where I live. They provide a magnificent range of kitchenware,bakeware(if there is a such thing),home-ware and so fourth. 

A year ago, I visited one of the stores locally and I scouted their shop ,particularly looking at the bakeware and kitchenware.
As you can see,there's such a wide selection, I have no idea how I'm supposed to pick and select a few of the products.

Head over to their website and see what they have to offer.

I'm finishing this post on a short note-these are ESSENTIAL baking tools and a shop where I'd buy my apparatus.

Before this post ends...

These acai bowls are absouletly moth-watering and just as amazing as they hopefully taste.


Quote of the month

Song of the month


Trend which I'm loving right now


Don't forget to follow me on my medias


Links to websites:


That's a wrap but I'll see you soon!

Αντίο!

Goodbye!

#sweetreats xx